A four part series… by Letitia Glenn
MUSCLE ATROPHY…
Principle Number 3
IDEAL SCENARIO FOR HORSES: And things we covered in Parts 1, 2 and 3.
CHECK. Position of the saddle and shims appropriate for horse:
CHECK. The balance point for the rider corrected if necessary:
CHECK. Space available for bulging shoulders and lifting back under the saddle:
Next, we need to ensure that the surface of the saddle is connected effectively along the horse’s back.
The interface is the working tool to accomplish that.
We’ve all seen saddles that “bridge” (Create pressure on the shoulders and the loins while leaving a void of “no contact” across the middle).
Conversely, many saddles press down on horses’ center back area and leave no room for the horse to contract abdominal muscles and push upward to round the topline.
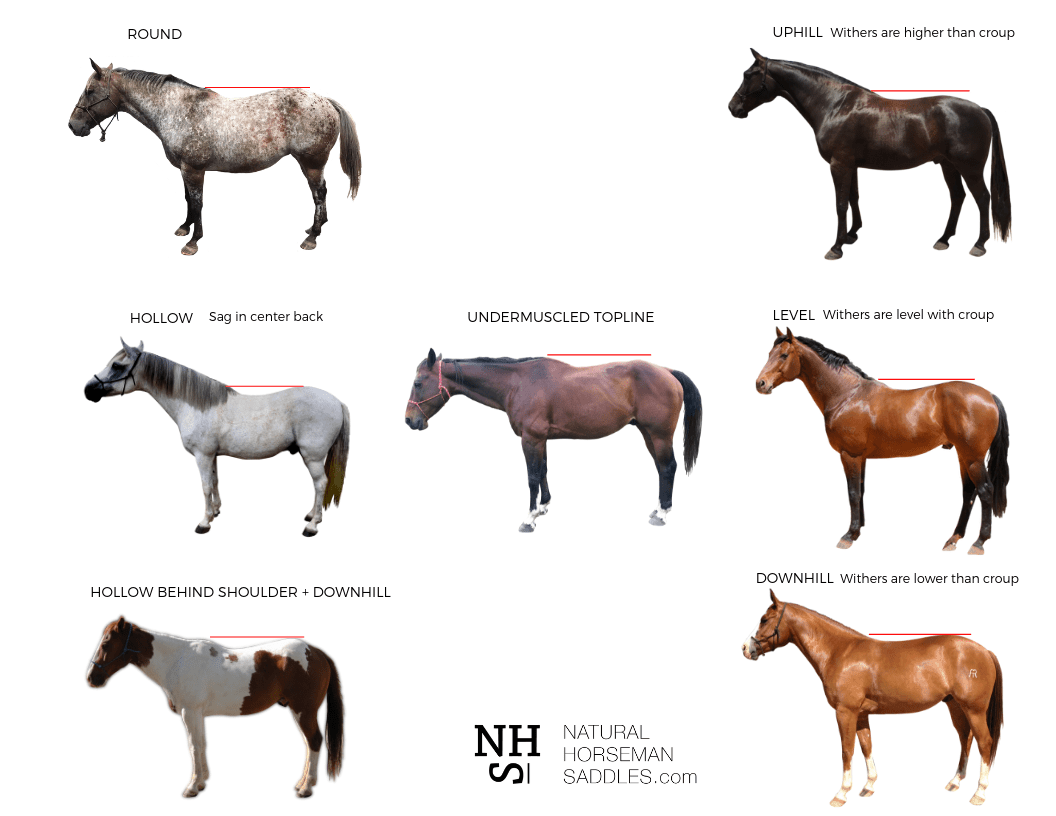
Some horses, for a myriad of reasons, have anomalies in their body profiles.
Such visible evidence as a ‘hollow’ or dropped back, pockets behind the shoulder/wither where the muscle has wasted, reduced top-line muscling, drooped abdomens, sloping rumps, and more.

Shimming can temporarily replace wasted muscles and create a lovely, even contact with the saddle. They are truly remedial/therapeutic tools!
This methodology can be a little more intensive/tricky and you may need some coaching. (This link will make it easy for us to help you)
Be sure to contact our team to receive advice if you are unable to nut this one out.
Here are some quick tips to consider when shimming for atrophied (missing) muscle.
- How does your horse look at a standstill vs in motion?
Do the muscles you think are missing somehow show themselves when in motion? - Does your saddle have the ‘space’ needed if you were to add additional support? For instance: if your horse has a sagging center back and your saddle has “rock”, adding a shim in the center would not be a good idea because it would add more pressure and hollow the back further. Our research does indicate that, if your saddle is too narrow, adding at least a thin shoulder shim set back at the scapula backswing point could be of benefit because it will free up a bit of space for the shoulder action. (see explanation and diagrams below).
- Keep an eye on your shimming. As your horse changes shape through training you may need to adjust – what worked a month or two ago may not be the case now. In general, “less is more”…we aim to use one pair of shims whenever possible…two at the most unless the situation is unusual.
WHERE TO PUT YOUR SHIMS
There are a few ways to use shims.
1 – The NHS range of Smart and Air Pads. These are purpose-built, designed to house shims and offer support to your saddle. To read more and explore our range of pads, check them out online at our website.
2 – For other types of saddle pads: You can simply place shims in position under your saddle and on top of your normal pad. When girthed/cinched up the weight of your saddle will hold them in place.
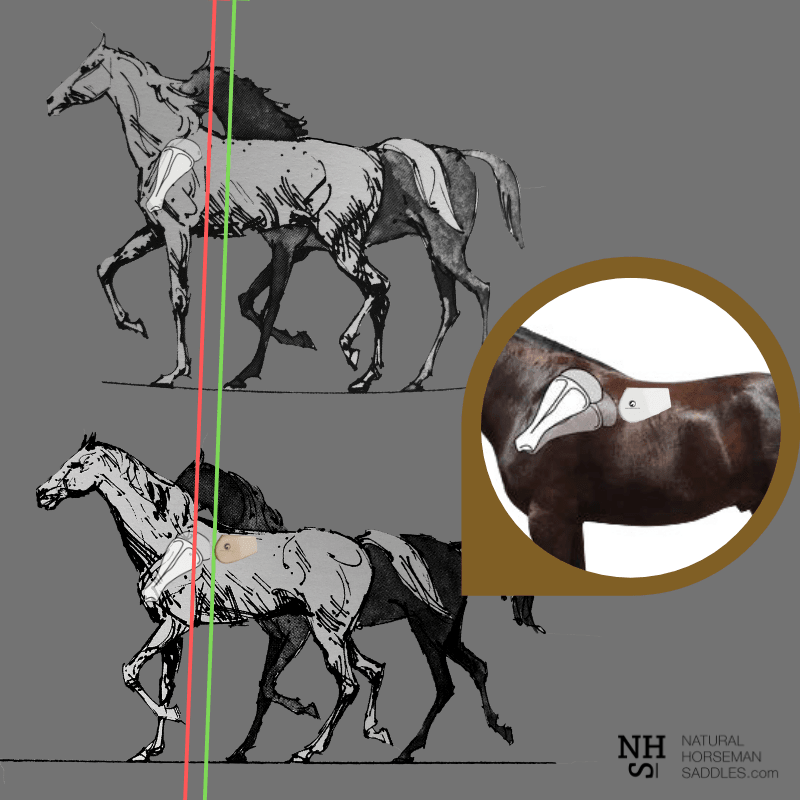
When it comes to PLACEMENT, start simple, and then adjust. As a first step, try ONE SHOULDER SHIM behind the maximum backswing point of your horse first.
There are of course other shimming patterns to try, but this is a great place to start. And the easiest.
So – What do we mean by ‘maximum backswing point’?
Well, your horse’s scapula swings BACK when he reaches forward with a foreleg in any stride. You want to place your shim’s thickest part – the “nose” – BEHIND that shoulder/scapula maximum backswing point.
That will lift and protect the back and forth motion of the shoulders.
*Look/feel to see where the bone/muscle moved rearward when you lift a front leg by the knee on a 90-degree angle and pull it forward a bit. If your horse has a plump/bulky shoulder area it may seem tricky to locate the back edge of the scapula. But if you dig a little bit firmly (you can still be gentle) with your fingertips, you should be able to feel where the muscular bulge drops off.
The image below demonstrates how the ‘scapula/shoulder blade’ travels backward and forward under the front of your saddle.

So there you have it…
Shimming can seem complicated, but it’s worth jumping in and trying with our methodology.
It can make such a difference to your horse and you’ll enjoy the positive difference in your ride!
Our research has yielded very simple formulae and we’re here to help you get confident if you need us.
Excitement is generally the result as riders watch and feel their horses float with rhythmic movement. They reach out and stretch, stride farther and rebuild what other saddles may have taken away.
We hope you’ve enjoyed this 4 part series and thank you for reading.
We also, on behalf of your horse, thank you for always seeking to improve comfort and health for ridden horses. They cannot provide it for themselves. You’re on the same mission we are.
To check our our range of pads and shims, or to contact us, please visit naturalhorsemansaddles.com and be sure to ask ANY questions you may have. Our team would love to explore shimming with your further.
Be sure to follow this blog and receive updates direct to your inbox!
If you have any questions in the meantime, be sure to email [email protected] or visit our website www.naturalhorsemansaddles.com

